Architecture
Build a best-in-class scalable static website
Posted by Rafael Lopes on .Those days I started looking for other blogging platforms, and I found some interesting options that covers minimalism, performance and scalability. Then I found Jekyll.
And then I found a very creative way to make something fantastic. Jekyll is a Ruby application that transforms plain text into static websites, perfect to be used in blogs. In this post I will cover how to create a website using Jekyll, upload your site to an Amazon S3 bucket using a tool called s3_website, configure a CDN distribution with CloudFront to accelerate your website, resolve names (DNS) using Route53 and make backups of your entire Jekyll workspace using Dropbox. This 7 steps tutorial will help you to get it.
The static website infrastructure
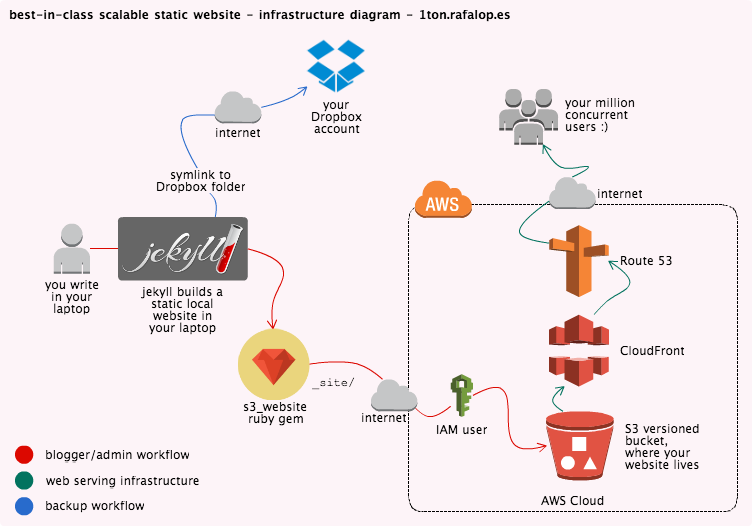
At the end of this post we should have this: one of the most optimized infrastructure in the world to serve static websites running an on-demand low budget. In this post I will show how to install and configure Jekyll on your laptop, how to create an IAM user with the correct permissions and how to use an application called s3_website to push the content to Amazon S3 and configure CloudFront distributions, with backups everywhere.
Why Amazon S3?
Since Jekyll generates static HTML+CSS content, Amazon S3 is the perfect platform to host your website because it provides secure, durable and highly-scalable object storage! It is easy to use, via API calls or using a simple web services interface to store and retrieve any amount of data from anywhere on the web; you pay only for the storage you actually use, there is no minimum fee and no setup cost. In this post we will use a project called s3_website to upload your static content to S3. Since budget is important for us (who don’t), check the S3 Pricing page.
Why Amazon CloudFront?
Because we are up to create a website that will be used by million users at the same time. We are very famous, your website constantly appears on TV and we don’t want to have a downtime on the most expected time :P - also, CloudFront bandwidth is cheaper than S3, since is a product focused on content distribution. Amazon CloudFront is a content delivery web service, which integrates with other AWS products to give you an easy way to distribute content to end users with low latency, high data transfer speeds, and no minimum usage commitments.
Why Route53?
Since CloudFront will give you a CDN endpoint that you can add to your DNS with a CNAME, you can use any DNS service, I’m choosing Route53 basically because they use Anycast and have DNS servers in 15+ locations worldwide. Their service seems well engineered for high uptime. Also, since we carry about performance, having your DNS resolve from those 15+ locations worldwide makes your website a little bit faster for your end users.
Why Jekyll?
Because Jekyll creates for you all the required static files to put in your S3 bucket. Jekyll is simple because databases or pesky updates no longer exists, fast as a comet because because provides only HTML and CSS, all static content, it’s blog-aware because has all the ecosystem on bloggers world, such as permalinks, categories, pages, posts, layouts, etc.
I don’t need to say that this UX will be fast as bolt since Jekyll generates your entire website in static content, it’s also easy to implement because you push those files anywhere, even GitHub! Yes! If you don’t want to pay anything to host your website, you can host your entire static website in GitHub using Jekyll. into anywhere that serves HTML content. Once you build your site on Jekyll, it’s ready to go.
Why s3_website?
Because it’s a well coded (Scala + Ruby) project that configures everything for us, from the S3 bucket to the CloudFront distribution, it’s very easy to use and to apply your local website to production, you can simply type s3_website push on your nearest terminal to have your website updated. Check out the project’s page
Why Dropbox?
We could create another S3 bucket and use s3_website again to push the backup to this bucket as well. So we would have 2 S3 buckets: one only to serve the frontend via HTTP and another one with all the files in the Jekyll workspace (backup), but since s3_website make changes on the configuration of the bucket making it public (because you want to use your bucket as a website), your backup would be treated as a public website too. Everybody uses Dropbox and probably has Dropbox installed in the laptop, so we will just create one symbolic link pointing Jekyll’s workspace to any Dropbox folder and we are good to go with backups. Sorry if you use Windows, you will have to place Jekyll’s workspace inside Dropbox, or download a third party application to perform symbolic links
Disclaimer
Since we will use some tools that automate jobs for you such as jekyll and s3_website, no experience is needed to follow this blog post, but a little knowledge about Amazon Web Services is welcome. I’m not responsible for unexpected charges in your AWS account. All billing on your account is your responsibility. If you follow this tutorial correctly you shouldn’t have any surprises on your AWS account, but it is totally your fault if you do something wrong, like leak your access key token and secret to a gist, GitHub, or somewhere else. That’s why AWS IAM users with correct policies are important.
This tutorial was made and tested in OSX using zsh shell, but all the commands should execute without errors on any Linux distribution that contains all the ruby and ruby-dev stuff installed. Command line experience is also welcome but not required to move on.
For naming purposes, we will create a bucket called mystaticbucket, our Jekyll workspace will be named as myturbowebsite and our CNAME will be mydomainzone.com. Since we are going to use some AWS services that has its workspace in common across all AWS users, some names can’t be repeated, so please take note of those names and change to your own when applying this tutorial.
Step 1: Install the Jekyll gem
According to Jekyll’s website, you can have Jekyll set-up and running in seconds. The following commands will install Jekyll on your computer! Note that gem can take some time finish.
$ cd
~ $ sudo gem install jekyll
~ $ [Jekyll] new myturbowebsite
~ $ cd myturbowebsite
~/myturbowebsite $ [Jekyll] serve
# => Now browse to http://localhost:4000
The command jekyll serve will make Jekyll instantiate a WEBRick (ruby webserver) running on the port 4000 on your laptop, and automatically watch all the contents on the editing folders, every time a file is added or edited on any of those editing folders, Jekyll regenerates all the required Frontend files to match this new change you made. While jekyll serve is running, open your favorite text editor and try editing the content in one file from the folder _posts/, wait 1 second, go to your browser and refresh the page, you will see that Jekyll regenerated the static Frontend. How cool is that?
There are a lot of interesting instructions that you can ask Jekyll, don’t forget to take a deep look in the Jekyll documentation, there you can find usage instructions, posts structure, how to create pages, handle multiple authors, troubleshooting and much more! The Jekyll documentation is a must see.
Before going to next step, keep playing with Jekyll in your laptop, explore the options and commands, read the documentation, personalize it, discover how the template works, read about Markdown file format (cheat sheet), create your template and make sure you understand at least 80% of how Jekyll works. It’s not hard to use.
If you played with the folders and tried to figure out what Jekyll is doing, you discovered that he writes and runs the webserver over the _site/ folder. This is the Frontend folder, the one we are going to sync to Amazon S3. The most important thing you should learn in this step is that everything that you do and Jekyll regenerates is written into this folder.
Besides being young, it is a very mature platform, that means you must think twice before saying ‘Jekyll doesn't do this’. It’s really well designed and customizable.
Notes
- There is a file in the root of Jekyll’s workspace called
_config.yml, this is the configuration file for the Jekyll itself. Note that changes made into this file are not automatically reflected into_site/folder, if you have Jekyll process running, you may want to restart it to see the changes applied. - There are tons of different Jekyll templates over the web, I don’t have ANY CSS and HTML skills (I believe this is harder than Assembly, or FORTRAN) and I this website is a Jekyll template that I bought :)
- As mentioned in the posts structure part of Jekyll’s documentation, the post files has to be named like this, otherwise you will have problems.
YEAR-MONTH-DAY-title.MARKUPStep 2: Configure an IAM user and set policy
Now that you are a Jekyll ninja, we can proceed to the next step! Create an IAM user on your Amazon account. AWS Identity and Access Management (IAM) enables you to securely control access to AWS services and resources. Using IAM, you can create and manage AWS users and groups and use permissions to allow and deny their access to AWS resources. Since we will use an application called s3_website that automatically pushes content to your S3 bucket for you and also configures a CloudFront distribution, we will create a user just for it.
Create the IAM user
Once logged in your AWS Account, go on the IAM Console and create a new user. The username is not important for us since this user won’t be used to login via AWS Console, make sure to note the access key token and secret after creating the user - be careful with those credentials, depending on the policy attached to your user, you can have almost the same permission as your root account. For our sanity, AWS applies ‘deny all by default’ policy to new users, your recently created user can’t do anything, so you have to attach a policy. As security is important to us, we will give this user just the permission needed to handle one S3 bucket and manages CloudFront distributions, but for now we will apply a ‘Power User’ policy because s3_website will need it to auto-configure the new environment.
Specify User Policy
Attach this User Policy to your new user in order to have s3_website working with no errors. Note that those permissions are too open, and we will restrict them to match only the needed resources once we have s3_website working and configured. We will cover correct permissions on the Part 6 of this post, no worries.
This is the first policy that we have to set on the recently created IAM user. It allows all permissions in all S3 buckets and all [CloudFront] distributions. We need it like this because since s3_website will configure things for us, we should keep it open. At the end of this post we will assign the correct permission to this policy.
{
  "Statement": [
    {
      "Action": [
        "cloudfront:*"
      ],
      "Effect": "Allow",
      "Resource": [
        "*"
      ]
    },
    {
      "Action": [
        "s3:*"
      ],
      "Effect": "Allow",
      "Resource": [
        "*"
      ]
    }
  ]
}
Step 3: Configure s3_website and AWS
Now that you have an IAM user created with enough permissions to make what s3_website needs to work, let’s move on!
Install s3_website gem
Take a look of how many things s3_website will do for you:
- Create and configure an S3 website for you
- Upload your static website to AWS S3
- Help you use AWS CloudFront to distribute your website
- Improve page speed with HTTP cache control and gzipping
- Set HTTP redirects for your website
Install command
'gem' command is quite slow, I don't know why.
~ $ sudo gem install s3_websiteConfigure s3_website properly
Now you should create a new directory (for organization purposes only) and ask s3_website to create a configuration file for you, which can be achieved following these instructions:
$ cd
~ $ mkdir -p s3upload-config
~ $ cd s3upload-config
~/s3upload-config$ s3_website cfg create
~/s3upload-config$ chmod 600 s3_website.yml #will have credentials inside? chmod immediately.
~/s3upload-config$ vim s3_website.yml
Here you are! Inside the configuration file for s3_website, on the first 3 lines of the document you should specify the IAM user access key, secret key and the S3 bucket name. As we noted those informations when created the IAM user, we can paste it there. If you closed the window on IAM Console without copying the credentials, you can go back there on, revoke the current one and generate a new one!
We don’t need to have the bucket previously created, because s3_website will create it for us since it don’t find any existing one with that name, by the way that’s why we have to assign the ‘Power User’ permissions to our IAM user. Got it?
Don't forget to adapt to your bucket name
s3_id: <IAM User id>
s3_secret: <IAM User secret>
s3_bucket: mystaticbucket
You also must fill the site: parameter with the folder which Jekyll generates the Frontend of your website, which in our example is:
site: ~/myturbowebsite/_siteAs we are concerned with performance, we would also like to uncomment those lines to enable CloudFront utilization and tune it:
You can define Cache-Control header, enable 'gzip' adding Content-Encoding header, and configure [CloudFront] distributions, ask for cache invalidations for each 's3_website push', etc. directly from the configuration file! Isn't it classy? Don't forget to change the CNAME to your domain.
max_age:
  "*": 600
gzip: true
cloudfront_invalidate_root: true

cloudfront_distribution_config:
  default_cache_behavior:
     min_TTL: <%= 60 * 60 * 24 %>
   aliases:
     quantity: 1
     items:
       CNAME: mydomainzone.com
On the CNAME parameter, you must put the CNAME that you will configure in your DNS in Route53 (your domain). This parameter will be setup on the CloudFront distribution. Since CloudFront is a global AWS product (like S3, one service for all customers’ namespace), you can’t have 2 CNAMEs with the same string in the entire CloudFront service. You can have multiple CNAMEs for each distribution, but it should not be configured on another distribution across all CloudFront service. If you insert a CNAME that is already being used by other AWS customer, you will get the error ‘One or more of the CNAMEs you provided are already associated with a different resource.’.
The parameter <%= 60 * 60 * 24 %> is just a mathematical expression to expose 86400 seconds, and this will be the Minimum TTL configured in your CloudFront distribution. 86400 seconds represents 1 day. So your website cached files will persist in CloudFront edge servers for 1 day before the cache purges; we don’t need to worry about this because we have the cloudfront_invalidate_root set to true, and this performs an invalidation (cache purge) on the changed objects for each s3_website pull performed. Invalidations are paid, but don’t worry about the this cost, because the price is according to your usage and there is no additional charges for the first 1,000 invalidated files monthly; thereafter the cost is $0.005 per file invalidated. Two files costs 1 cent. Note that it is 2 files, not 2 invalidations, since each invalidation may contain multiple files.
Apply the configuration to Amazon Services
Now that we installed and configured s3_website to do what we want, we just have to use it to apply the configuration to S3 and CloudFront distribution, this command will do that for you:
~/s3upload-config$ s3_website cfg applyWhen you run this, it will ask you whether you want to deliver your website via CloudFront, say yes (it is not the default). Answering yes, the application will use the IAM credential informed in the file to create a CloudFront distribution for you and will also automatically edit the s3_website.yml, filling up the parameter cloudfront_distribution_id: with the ID of the created distribution, if you want to visualize the CloudFront distribution properties and preferences, go to AWS Console and look for the CloudFront Console service page.
Notes
- If the source code of your website is publicly available, ensure that the
s3_website.ymlis in the list of ignored files. For git users this means that the file.gitignoreshould mention thes3_website.yml. - If you use the
.dotenvgem, ensure that you do not push the.envfile to a public git repository. - As you did with Jekyll, don’t miss the s3_website documentation, explore all options, make some tests, play with features, test them! The documentation is very well explained, and my objective is not copy and paste anything here, so go there and read what else you can do with this amazing tool!
Part 4: Push your website to AWS
You now have Jekyll working properly and building your site correctly to the _site/ folder under Jekyll’s workspace, you also have s3_website configured and 2 Amazon services correctly configured to serve contents to your users. What we must do now is push the contents to the bucket, with this lovely command:
~/s3upload-config$ s3_website pushThis command pushes your _site/ folder from your Jekyll’s workspace to the S3 bucket. Note that you must run it from the same folder as the s3_website.yml resides, otherwise you would have to tell it’s path to the s3_website command. The push option is smart, and sync the site in your laptop with the S3 bucket, applying just files that changed or has been deleted.
Amazing! You now have a working website, distributed via CloudFront CDN to your users! Isn’t that amazing? In 10 minutes you were able to follow a tutorial and make a website which is scaled by default using Amazon Web Services.
Since this step represents the deploy to production, you will want to execute s3_website push always when you write a new post or make some change in your website, remember to review your content in your laptop before pushing it. You should make sure that you performed a jekyll build before pushing, or have jekyll serve running, since this option auto builds and show in a browser for you. To view your local website on your laptop’s hard disk, just keep jekyll serve running and open your browser to http://127.0.0.1:4000.
Part 5: Configure the DNS
Now that you pushed your website contents to the bucket using s3_website, you can open your browser and check how your website is blazing fast. You have 2 options of delivering your website, one via Amazon S3 and other one via CloudFront. To follow our initial schema, as we want lightspeed performance and caching acceleration, we will get the CloudFront URL and set in our DNS record, on Route53.
First of all, go in your CloudFront Console and copy the ‘Domain Name’ of the CloudFront distribution that s3_website created, it should be something like this pattern: de988ys007wb.cloudfront.net.
No open your Route53 Console (or your DNS server), go to your DNS zone (mydomainzone.com in our example) create a CNAME from your website to the CloudFront Domain Name:
mydomainzone.com (CNAME) de988ys007wb.cloudfront.netWait for DNS propagation and your website should be good to go. Now you have almost the structure desired on the beautiful diagram in the beginning of this post.
Part 6: Restricting IAM permissions
Now that we have everything configured and bootstrapped by s3_website, we would like to close the IAM policy attached to our IAM user. Currently, we have a policy assigned that allows permission to make everything on the S3 bucket and CloudFront, and this is not good. With great powers come great responsibilities, and we don’t want our IAM user with permissions that it would not use.
This policy makes the user access only the `mystaticbucket` bucket. This is much better than open the permissions to all buckets.
{
  "Statement": [
    {
      "Action": [
        "cloudfront:*"
      ],
      "Effect": "Allow",
      "Resource": [
        "*"
      ]
    },
    {
      "Action": [
        "s3:*"
      ],
      "Effect": "Allow",
      "Resource": [
        "arn:aws:s3:::mystaticbucket",
        "arn:aws:s3:::mystaticbucket/*"
      ]
    }
  ]
}
Part 7: Dropbox Backup
This is the easiest part. To perform Dropbox backup of your entire Jekyll workspace in your laptop, just create a symbolic link! Since you accidentally don’t erase your folder, your files are in sync with Dropbox. You may also like to make a symbolic link to the folder which contains the s3_website.yml file.
$ cd
$ ln -s ~myturbowebsite <your Dropbox PATH>
You also have the option to create your Jekyll’s workspace inside the Dropbox, this way you are already backed up without needing symlinks. Windows users may need that since creating a simple symbolic link in this platform is as hard as write a screensaver in OpenGL using FORTRAN. Good luck!
Overall notes and article CI
- 30/nov - Check out this video from John Mancuso, AWS’ Solution Architect presenting about how to achieve something like this post on 2014 re:Invent.
- 30/nov - If you use CloudFront to deliver your website using the configuration above, any changes that you make will be reflected in production ~10 minutes later, since CloudFront needs to invalidate the changed objects (s3_website ask that to CloudFront for your pleasant convenience).
- 30/nov - Did you like this post? Share it or leave a comment, I spend 3 days writing and reviewing this thing, LOL.

Rafael Lopes (?)
Tech-lover, also loves photography and curiosity. AWS Cloud Ninja. What I enjoy? Learn from unknown internet blogs like this one.